The Data Review Window
New in version 3.5.779
When you Save to Sage, Excelerator first reads the data from the sheet and shows it to you in the Data Review window. Nothing is sent to Sage until you click OK.
The window shows the data exactly as Excelerator read it, after rules such as carrying forward blank values and only processing unsaved rows have been applied. This lets you check what is about to be saved, rather than what you expect is on the sheet.
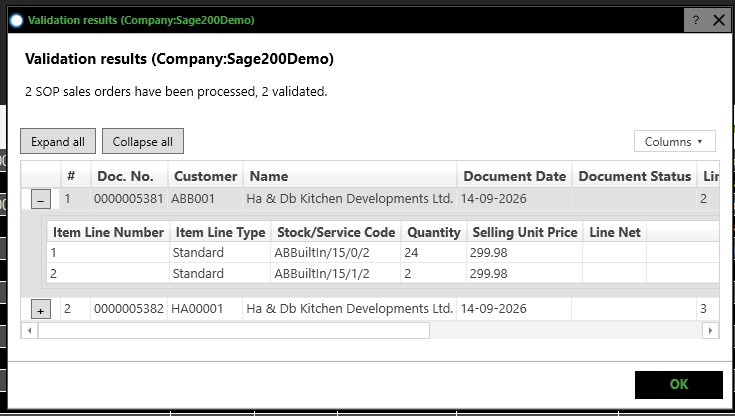
The same window is also used to show the result of a save, and the result of a successful Validate.
When the Window Opens
| You click | The window opens | Window title | Buttons |
|---|---|---|---|
| Save to Sage | After Excelerator reads the sheet, and before anything is sent to Sage | Save to Sage (Company:name) | OK, Cancel |
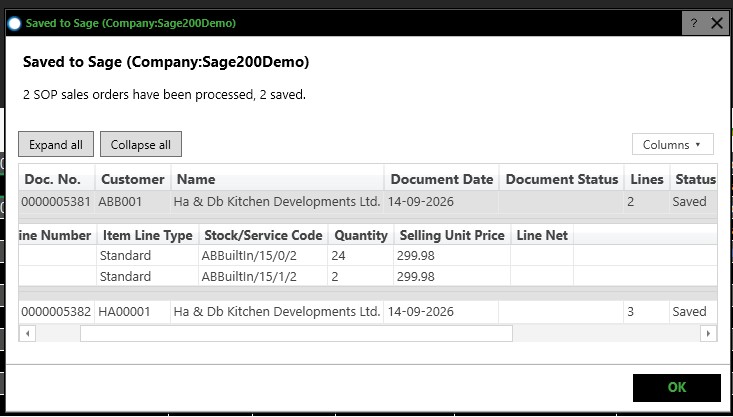
| Save to Sage | After the save, when it finishes without errors | Saved to Sage (Company:name) | OK |
| Validate | After validation, when it finds no errors | Validation results (Company:name) | OK |
name is the Sage company that the data is saved to or validated against.
If Excelerator finds no data on the sheet, the window does not open, and Excelerator tells you that no data was found.
If Validate finds errors, the window does not open. The errors are listed in the Validation panel instead, as described in Validate Sage Data.
Calculate Values also checks the data after it calculates. When that check finds no errors, the Validation results window opens in the same way as for Validate.
Info
The Data Review window replaces the "Do you want to save to Sage?" question that earlier versions asked before they read the sheet. There is no option to switch the window off.
Some modules work slightly differently:
- Price Bands: when you save prices side by side, the window does not open before the save.
- Stock: when the sheet includes a location range, Excelerator first asks whether you want to save with locations. The Data Review window opens after you answer.
When Excelerator is run from a VBA macro, the window does not open. The save continues unless the module's non-interactive defaults file answers the Excelerator.SaveConfirmation confirmation with Cancel. See The save confirmation.
What the Window Shows
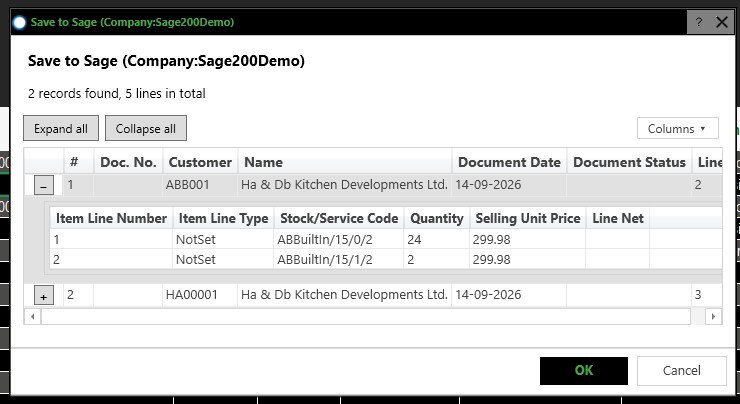
At the top of the window is a summary line. Before a save, it counts the records found on the sheet and, when the records have lines, the total number of lines. For example: 2 records found, 5 lines in total. After a save or a validation, the summary tells you how many records were processed, and how many of them were saved or validated.
Before a save, the window can also show warnings above the summary. Read these before you click OK. For example, Excelerator warns you when:
- the Transaction Size or Continue save on error? option is set, but the sheet has no UpdateStatus range to record the result in.
- the sheet has an item-level Sage Company range, but the transaction size is not set to 1. Excelerator sets it to 1 for you.
- the sheet has only header ranges and no line ranges. Only updates to existing records are then allowed.
Below the summary is a grid with one row for each record, such as an order, a journal, an invoice or a customer.
- The # column numbers the records in the window. It is not the row number on the sheet.
- The Lines column shows how many lines each record has.
- The Company column is shown when the sheet sets a Sage company for each item (see Updating Multiple Companies from One Sheet).
- The Status column is shown after a save or a validation. It shows the result for each record, for example Saved.
- The other columns are the fields that Excelerator read from the sheet. You choose which of these are shown. See Choosing the Columns.
Dates are shown in your Windows short date format, and numbers are shown with no more than two decimal places. This affects only how the values are shown in the window, not the values sent to Sage.
When Only Process Unsaved? is set, rows that were already saved are not read from the sheet, so they are not shown in the window.
Records with Lines
In modules where a record has lines, such as sales orders or journals, each record starts collapsed.
- Click + next to a record to show its lines, and – to hide them again.
- Click Expand all to show the lines of every record, or Collapse all to hide them.
Choosing the Columns
Click Columns to open the column picker. It lists the fields that Excelerator read from the sheet.
- The Header tab lists the fields of each record. When the records have lines, a Line tab lists the fields of the lines.
- Tick a field to show it as a column. Clear the tick to hide it. At least one field must stay ticked on each tab.
- Click ▲ or ▼ next to a field to move its column left or right.
- Type in the search box at the top of a tab to show only the fields whose names contain that text.
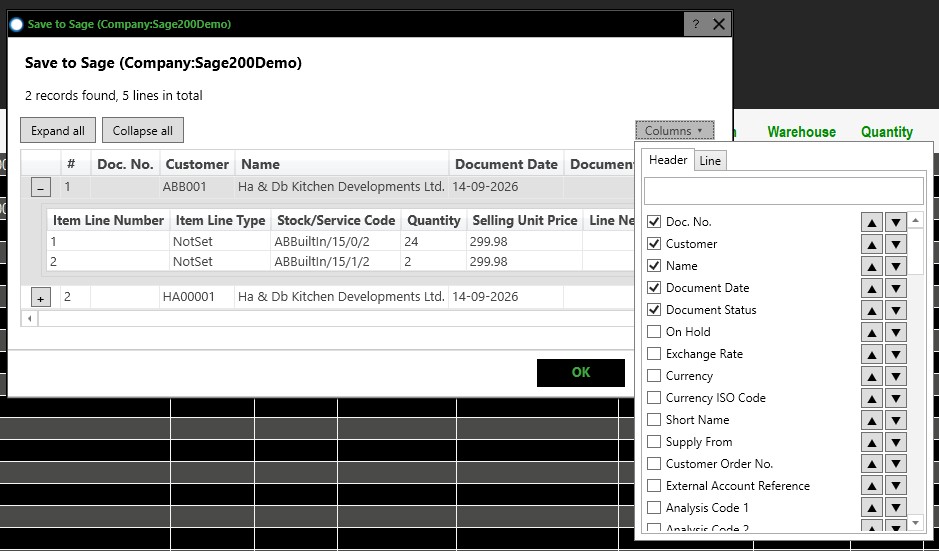
The #, Lines, Company and Status columns are always shown, so they are not in the list.
The fields are listed by the range headings on your sheet. When two ranges have the same heading, Excelerator adds the name of the range group in brackets so you can tell them apart. For example, a Sales Receipts sheet with two bank charges lines lists Nominal Code (Bank Charges 1) and Nominal Code (Bank Charges 2).
Excelerator remembers your choice of columns, and their order, as soon as you change them. The choice is kept separately for each module, worksheet and Sage company, and is used again the next time the window opens for that sheet. Excelerator also remembers where the window was on the screen.
Continuing or Cancelling the Save
When the window opens before a save:
- Click OK to save the data to Sage. OK is not available when the window shows no records.
- Click Cancel to stop. Nothing is sent to Sage, and no save status is written to the sheet. Correct the sheet, then click Save to Sage again.
When the save finishes without errors, the window opens again with the title Saved to Sage. It shows the records that were saved, with the document numbers that Sage gave them, and the Status column shows the result for each record. Click OK to close the window.
After Validate
When Validate finds no errors, the window opens with the title Validation results. It shows the data that was validated, with a Status column, so you can check that Excelerator read the sheet as you expected before you save. Click OK to close the window.