Stock
Introduction
Stock Excelerator allows Sage 200 Stock Items to be added and amended.
Features include:
- Stock item records can be created or amended individually or in bulk.
- Existing stock item records can be downloaded and amended.
- Existing stock item records can be deleted.
- Browse Sage data and pick from browse to enter on the sheet.
- Ability to print existing Sales Ledger Aged Debtors report directly from Excel.
Please see our tutorial on using Stock Excelerator.
This Excelerator does not adjust stock levels. It is for maintaining stock item records only. If you want to adjust stock levels from Excel, please check out our Stock Adjustments Excelerator.
Standard Templates
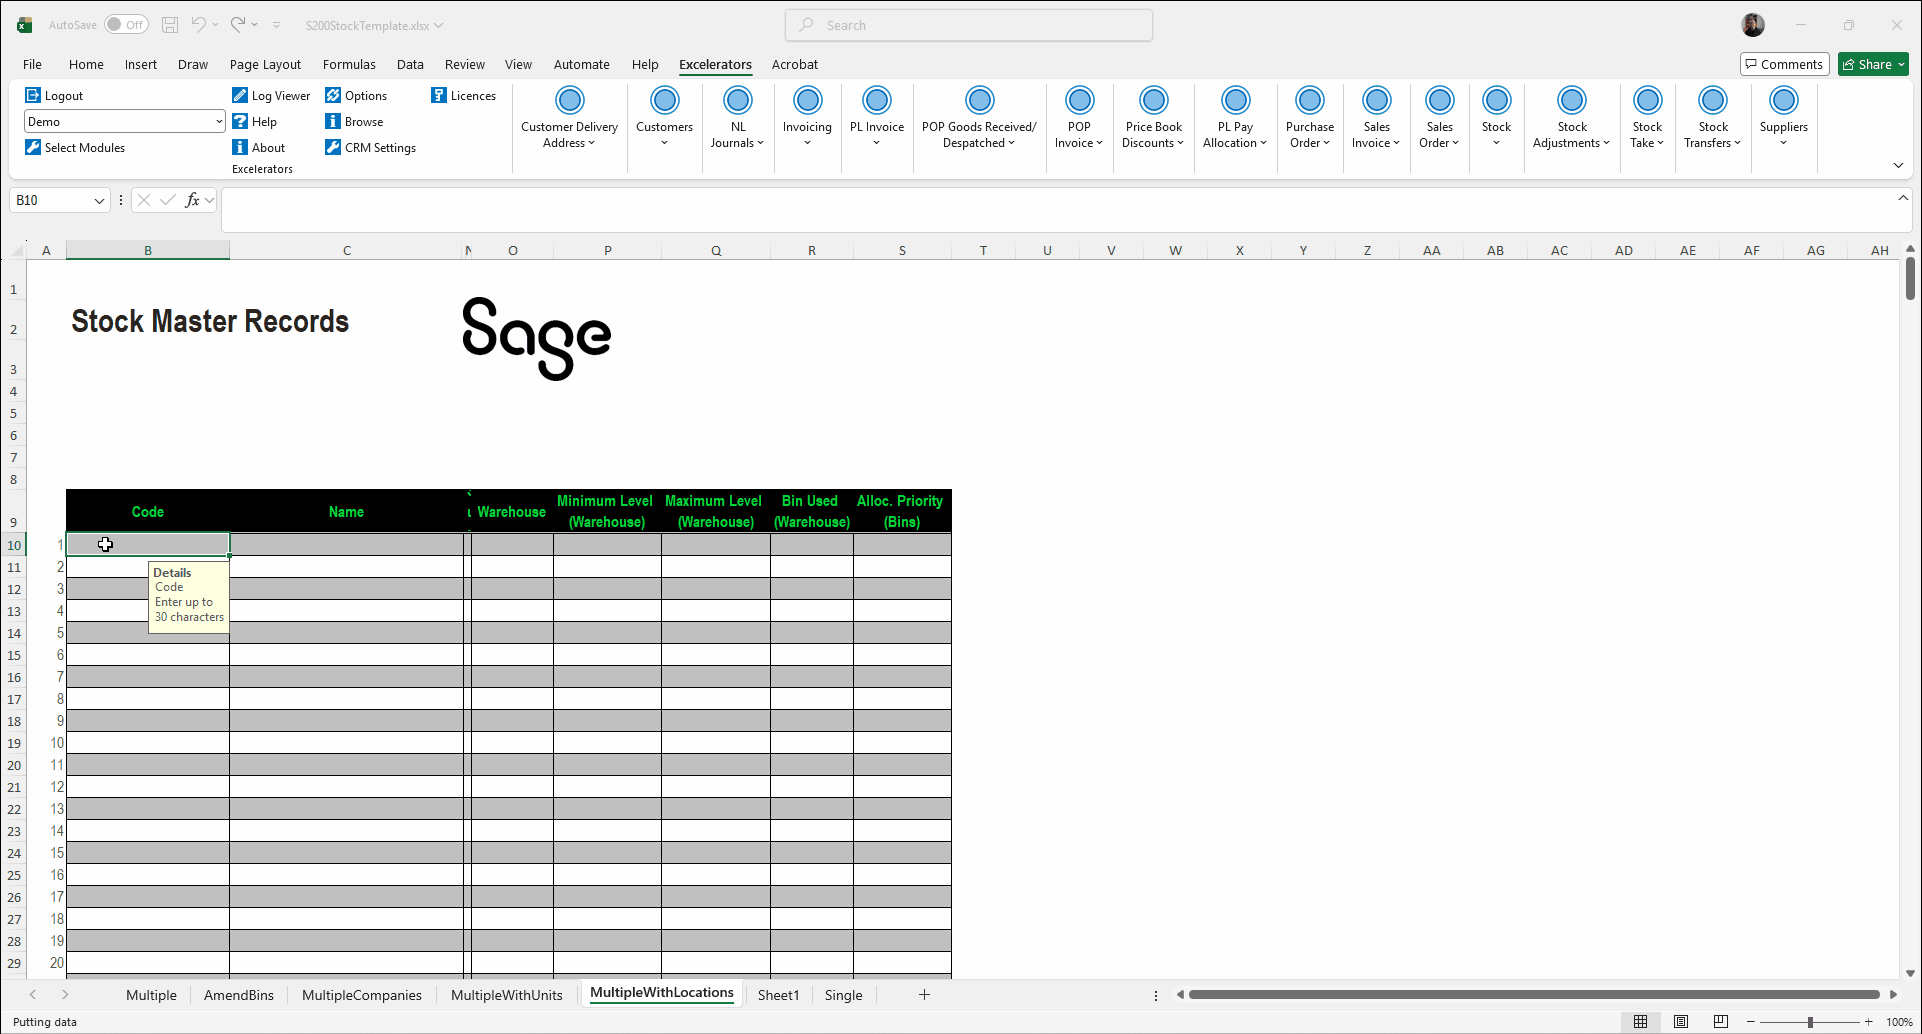
Codis provides the template S200StockTemplate.xlsx. You can, of course, amend this template or create your own. (See Designing Templates.)
The S200StockTemplate.xlsx includes sheets that allow:
- Single - Entry of a single stock item.
- Multiple - Entry of multiple stock items.
Maintaining Locations and Bins
Sage 200 stock items can have multiple warehouses, locations, and bins against them if the Use Multiple Locations option is enabled (see Sage 200 Help for more information).
Excelerator provides ranges for locations and bins. To preserve the hierarchy, locations are entered in a column listed against the stock code, and the corresponding bins are entered in the adjacent column.

Locations and bins can be added, renamed, and removed from stock items using Excelerator.
Note
See the Ignore Missing Locations?. This option controls how empty location and bin ranges are treated when saving. If this option is ticked, empty location and bin ranges will be ignored, and no locations or bins will be removed from the stock item. If this option is not ticked, you will be prompted to confirm whether any missing locations or bins should be removed from the stock item. If the ranges are not present on the sheet at all, they will be ignored regardless of the setting of this option.
Adding a New Bin
Update an Existing Bin Name
Remove a Bin
Note
Ignore Missing Locations? needs to be unchecked from options to remove bins by Excelerator.
Populating a Sheet with Locations and Bins
The Populate feature will populate the sheet with locations and bins for any stock items already entered on the sheet. This is a quick way to pull in existing locations and bins for stock items that you want to amend.
This GIF shows the different behaviour of browse/download versus populate with regard to locations and bins.
Options
Save Validated Items Immediately?
This option determines how Excelerator saves stock items from the Save option.
If it is not ticked, Excelerator will validate the entire sheet and save it if all stock items are valid.
If it is ticked, Excelerator will validate one stock item, save it if valid, and move on to the next stock item.
Do Not Ignore Blank Ranges?
This option controls what happens when you update a stock item and the spreadsheet does not include all of the warehouses, locations, or bins that already exist against that item in Sage 200.
Ticked (default) — Any warehouse, location, or bin that is present in Sage but absent from the spreadsheet is left untouched. Use this setting when your sheet covers only a subset of locations and you do not want the remaining locations to be affected.
Not ticked — If a warehouse, location, or bin exists in Sage but is missing from the spreadsheet, you will be prompted to confirm whether it should be deleted. If you confirm, that location or bin will be removed from the stock item during saving.
Download Ignores Inactive Products?
If this option is ticked, the stock download and browse will not include inactive products.
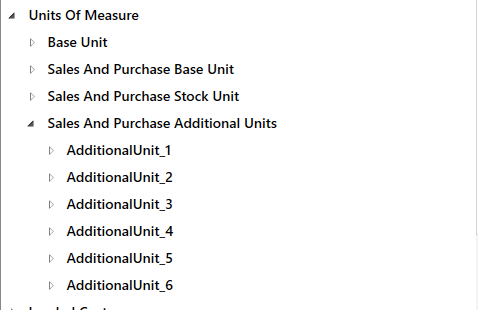
Sales and Purchase Units Array Size
This option determines the size of the array of additional sales and purchase unit ranges. This is set by default to 5.
If this option is changed to "6", there will be six sets of additional units available in the designer, as shown below…
Delete Units That Are Not on Sheet?
This option should be used with care. If ticked, and you amend an existing stock item that has additional units, units not included on the Excelerator sheet will be deleted from the stock item (unless orders have already used those units).
Ignore Missing Locations?
This option determines whether missing locations are ignored when amending bins. If ticked, missing locations will be ignored. To remove bins, this option must be unchecked. See the Maintaining Locations and Bins.
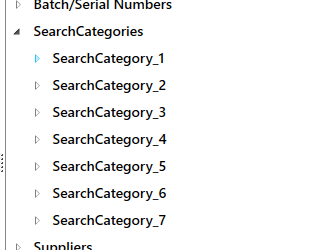
Search Categories Array Size
This option determines the size of the array of search categories ranges. This is set by default to 5.
If this option was changed to "6", then six sets of search categories will be available in the designer, as shown below…
Deleting Stock Items
Changed in version 3.5.601
Prior to this version, the right-click delete option would only delete a single stock item and the stock items to be deleted were not listed.
Warning
The "Delete" feature enables you to delete all the stock items present on the worksheet.
Please note that only the stock items that can be deleted according to Sage business rules will be removed.
There are two ways to delete stock items: from the ribbon menu, which deletes all stock items on the sheet, or by right-clicking to delete a specific selection.
Ribbon menu — Delete
Click Delete in the ribbon to delete all stock items currently on the sheet.
A confirmation window will appear listing every stock item code that will be deleted. To proceed, type DELETE in the confirmation box and click OK. Click Cancel to abort without making any changes.
Once confirmed, each stock item is deleted in turn. A results window is then displayed showing the outcome for each record, including any that could not be deleted and the reason why.
Right-click — Delete Stock Item
Select one or more rows on the sheet by clicking and dragging, or by holding Ctrl and clicking individual rows. Right-click the selection and choose Delete Stock Item.
- Single stock item — a simple Yes/No confirmation is shown before proceeding. There are two ways to delete stock items: from the ribbon menu, which deletes all stock items on the sheet, or by right-clicking to delete a specific selection.
- Multiple stock items — a confirmation window lists all selected stock item codes. Type DELETE in the confirmation box and click OK to proceed, or Cancel to abort.
Populate
This feature will pull data from Sage for stock item codes already entered on the worksheet. Data already entered will be overwritten, and invalid codes will be ignored but will be shown to the user after the sheet has been populated.
See Populating a Sheet with Locations and Bins for more information on how this feature works with locations and bins.
Stock Printing
You can print stock details from Excelerator by clicking the Print button.
- The stock item details must already exist in Sage. You cannot print new stock items on your worksheet until you have successfully saved them to Sage.
- The print option prints all the stock items on the sheet or only those you select.
See Printing
Attachments
New in version 3.5.605
Excelerator supports the saving, amendment and deletion of attachments.
Info
- You cannot save links to attachments or folders.
- If you want to change an attachment, a file URI will only be considered changed if the file name (not the path) changes.
- Saving a large number of large files may be slow.
- On a new record, fill the attachment rows from the top with no gaps. A blank URI followed by a non-blank URI below it will be rejected on validation. (On an existing record, a blank row is allowed and is treated as "delete the attachment at that position".)
- Every attachment row needs a file URI. A blank URI with text in the Description column is rejected.
Warning
Saving a blank URI will delete an existing attachment (a warning will be displayed).
To maintain attachments using Excelerator, add the attachment ranges to your worksheet. Enter a URI and a description for each of the attachments.
You can set the number of attachments you want to maintain by changing the size of the attachment ranges in the options.