Using Excelerator To Import Data
Overview
Excelerator is a robust tool for efficiently importing CSV data.
- Tailor-made templates can be created to match your incoming data.
- Excelerator automatically fills in missing data, including the generation of account numbers.
- Data mapping can be easily accomplished using Excel.
- Data validation is conducted, and any errors are clearly highlighted with reasons provided sent back to the sheet.
- It offers a smooth transition to using Orchestrator for complete automation of the interface.
Additional features include:
- Storage of identifiers (e.g. customer numbers) from external systems, which aids in preventing duplicate imports and linking data from various systems.
- Measures to prevent duplication such as validation of duplicate customer order numbers and invoice references.
- An Export Range Schema to create a definition of the CSV data expected, including descriptions of the data.
- A CSV Import Tool is also provided to facilitate data import into the workbook.
- Tracking of Saved Data to allow large volumes of data to be imported.
- The ability to save to different Sage companies from a single import file (see Using the Item-Level Company Range).
Tracking External IDs and Duplicate Prevention
Two common issues that can occur with importing data from an external system are:
- After the data has been imported, it can be difficult to tie the external system data to the Sage data. For instance, you may have a CRM system that owns the customer data. You want to be able to identify customers in Sage for the CRM customers, and vice versa. Sometimes, this is straightforward - you use the identifier (IDs) in the external system as the identifier in Sage. However, sometimes identifiers in external systems have too many characters to be stored in Sage, meaning that this approach cannot be followed.
- Preventing data from being imported more than once. This is particularly a concern for transactional data such as Sales Orders. This is a particular risk in manual interfaces or disconnected ones (like web services).
Excelerator solves these issues:
- When importing the data, external IDs can be included in the data being imported. The data should not be stored in the Sage ID but in a spare data field.
- It generates Sage IDs for new records (e.g. order numbers and customer numbers) when importing. The new Sage ID is stored alongside the external ID on the Sage record.
- It checks that the external ID does not already exist in the Sage system. If it does exist, you can choose whether to allow the record to be updated.
- It allows transactional data (Sales and Purchase Orders and Returns, Sales and Purchase Invoices) to use the external customer or supplier ID.
In addition to preventing duplicates, tracking the external ID allows the ID to be fed back to the external system, which will allow it to track Sage's ID against its own.
The modules that support this functionality
Master Excelerators
- Customers
- Suppliers
- Stock
Transactional Excelerators
- Sales Orders
- Purchase Orders
- Quotations
- Sales Returns
- Purchase Returns
- Invoicing
These modules include an external ID range and an option to specify which Sage data field to store the external ID in. Excelerator will store the external ID found in the range in the specified property for the created entity. If an import is attempted with the same external ID for the same entity, Excelerator can either, according to the options you select, reject the data as a duplicate or attempt to update the entity.
Warning
You cannot amend external IDs using Excelerator once they are saved.
The Transactional Excelerators also include an "External Account Reference" range to supply the external account ID and an "External Account Code Field" option to specify which data field on the customer or supplier record the external ID is stored in.
When these are included, Excelerator will store the external ID in the specified property for the created entity. If an import is attempted with the same external ID for the same entity, Excelerator can either, according to the options you select, reject the data as a duplicate or attempt to update the entity.
Example
This could be data imported using the Customers Excelerator with the option set:
| Option | Value |
|---|---|
| External ID Field Name | SpareText1 |
Imported data:
| Account | Name | Short Name | External ID |
|---|---|---|---|
| Test Customer | TestCust | CUST-222-33333 |
After saving using Excelerator, the Sage account ID is generated and returned to the sheet:
| Account | Name | Short Name | External ID |
|---|---|---|---|
| 0000001 | Test Customer | TestCust | 111-222-33333 |
We can then import an order using the Sales Order Excelerator with options set:
| Option | Value |
|---|---|
| External ID Field Name | SpareText1 |
| External Account Code Field | SpareText1 |
We will use two external IDs. One for the order, and one for the customer that we have just created:
| Doc No | Order External ID | Customer | External Account Reference | Stock/Service Code | Warehouse | Quantity |
|---|---|---|---|---|---|---|
| ORD-111-222-3333 | CUST-222-33333 | ABBuiltIn/15/1/2 | WAREHOUSE | 4 |
This will save a new order for the Sage customer: 000001
Import CSV Data
Excelerator provides two ways of using CSV data that arrives from an external system.
- Open the CSV file in Excel, then Load a Range Definition to apply ranges to the worksheet.
- The CSV Import Tool.
CSV Import Tool
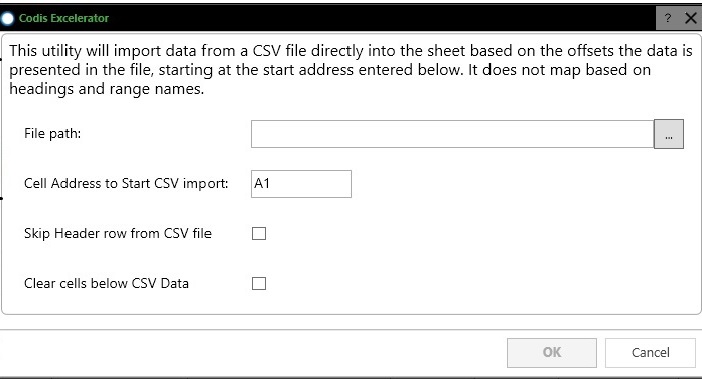
As of version 3.5.215 Excelerator provides a raw CSV Import Tool. This tool is accessible from the Tools ribbon menu for each module. Unlike the Load Range Definition method, this allows the CSV data to be used in a worksheet with formula and other data.
This tool imports a CSV File into the current worksheet.
- Data from the CSV file is placed directly onto the sheet, with each field occupying the same row and column.
- The formula on the current worksheet will not be overwritten.
- CSV Header ranges are not used by the Import CSV Tool and should not be included in the CSV.
You may want to save the workbook before using the CSV Import Tool, as it will overwrite any data or column headings with data from the CSV, where there is data. Also, be careful of having AutoSave activated before using this tool.

- File Path : Allows the user to browse and select the CSV file to be imported using the interface.
- Cell Address to Start CSV Import : Specifies the starting cell for importing data. For example, "A1" means the data will begin at column A, row 1.
- Skip Header Row from CSV File : If ticked, the tool will ignore the header line if present in the CSV file.
- Clear Cells Below CSV Data : This option clears all data below the imported CSV data, leaving only the CSV data on the sheet.
Export Range Schema
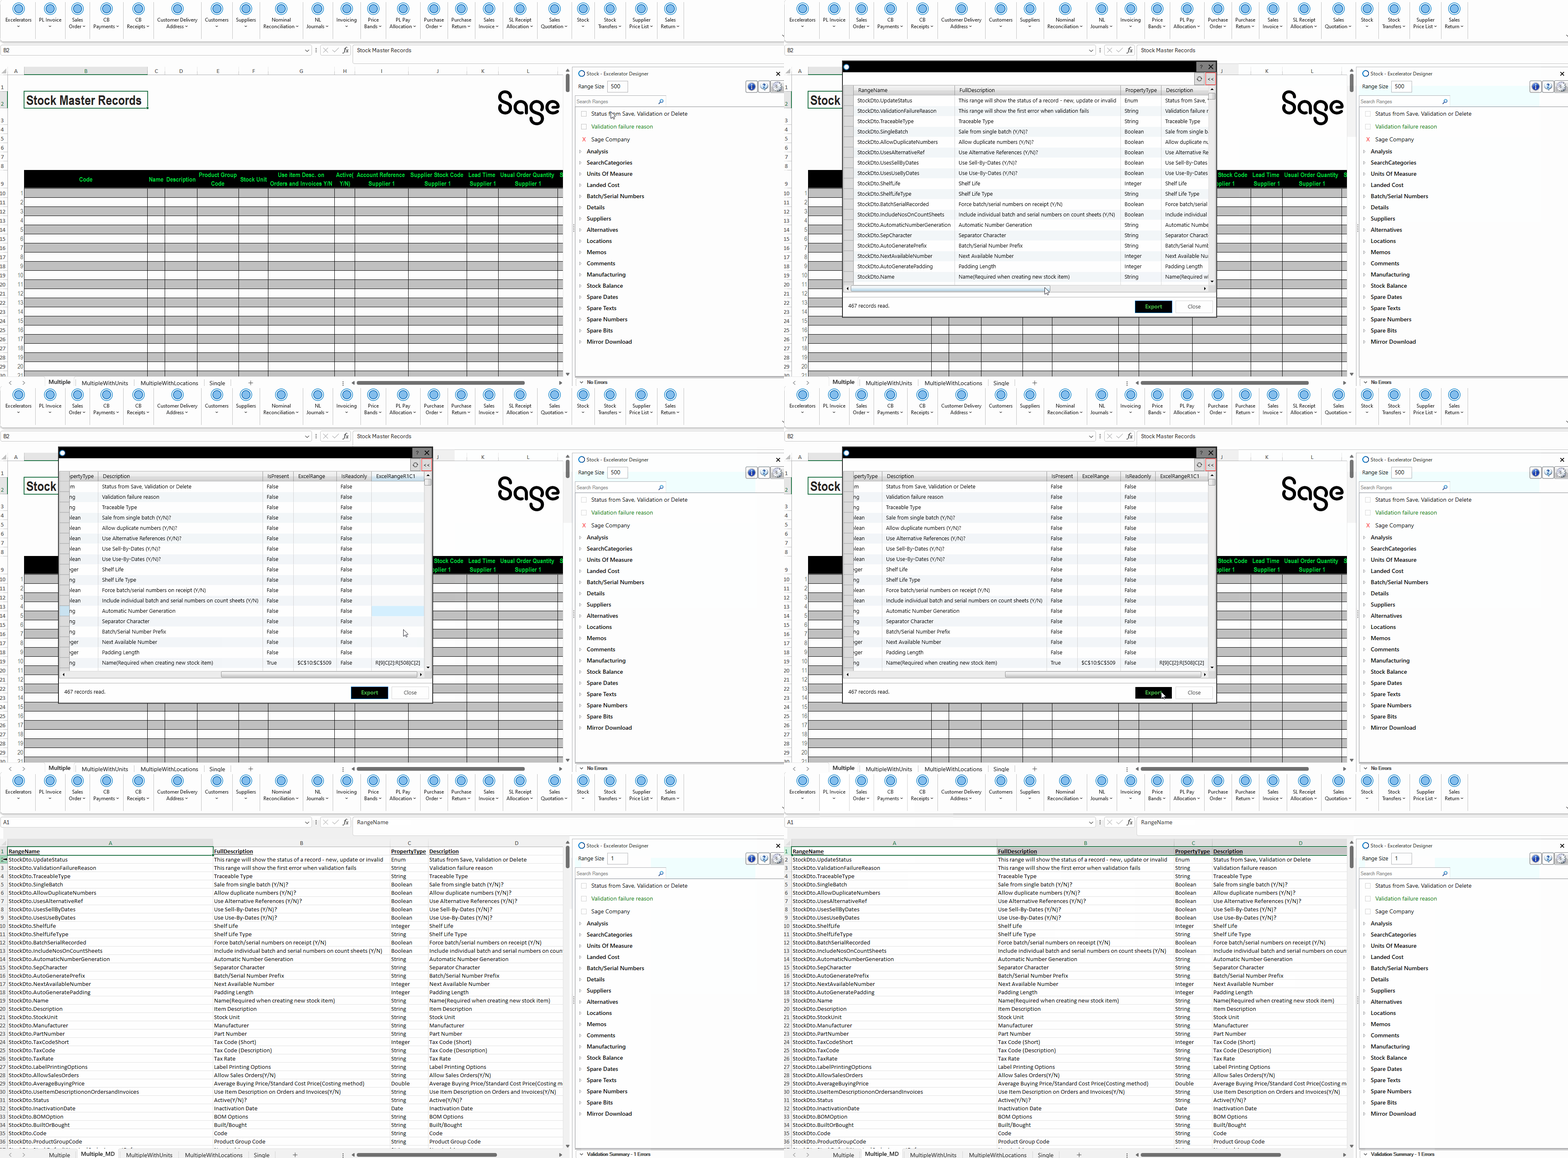
Export Excelerator Range Scheme
The "Export Excelerator Range Scheme" feature was introduced in version 3.5.215 of Excelerator. It is accessible from the Designer. This feature will show a tabular list of all the ranges available for the module, indicating whether the range is present on the sheet and its location on the sheet. The range position is provided in standard Excel address and R1C1 format. The R1C1 format can be useful for describing where CSV data should be placed.
