Options
Designer Options control the default behaviour of the ranges. Options can have one of two settings enabled or disabled.
Excelerator template designers should set the options before the Designer is used to configure a template.
Add Browse
Click 'Add Browse' to enable browsing of Sage Data.
See Browse/Download Sage Data.
Add Excel Format To Range
If this option is ticked, Excelerator will automatically set an Excel format for the range when a user adds a range using the Designer. The format added will depend on the type of the data:
Dates: The range will be formatted to the Excel format "dd/mm/yyyy".
Numbers: The range will be formatted to an Excel custom format: "0.00_ ;-0.00" (a number, with two decimal places)
Excelerator will format all other types to text format.
Warning
You should be careful not to set Text type ranges to numeric formats unless you are sure this is what you want.
Excel will strip leading zeros from numeric format cells. You may use leading zeros in your Sage number scheme e.g. nominal codes, customer codes, and these could be lost.
Validate Length on Load
If the data entered in the sheet exceeds the character limit allowed by Sage, Excelerator's response will depend on the selected option. If the option is checked, an error message will appear when loading the data from the sheet. If the option is not checked, the excess text will be truncated.
Add Length Validation
If this option is ticked, the Designer will add Excel validation on the length of the data entered into a range (text ranges only) and date validation (for date ranges) when adding ranges to the sheet.
For instance, when this option is ticked, and the Nominal Account Code range is added, only up to 8 characters may be entered (for Sage 200).
Add Column Headings
If this option is ticked, when Detail or Header/Detail type ranges are added, Excelerator will add a heading on the line above the selected range.

Add Header Labels
Header labels are similar to Column headings except that they apply to the Header Ranges, with the Label appearing to the left of the range.
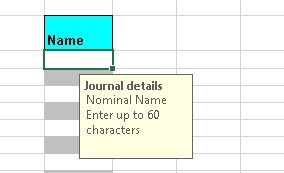
Add Tool Tips
When this option is ticked, Excelerator will automatically add office Tooltips for the range when a range is added.
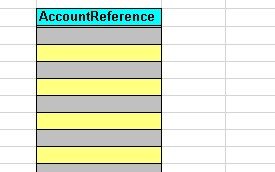
Add Colour
This option allows the background colour to be present for ranges added to the sheet.
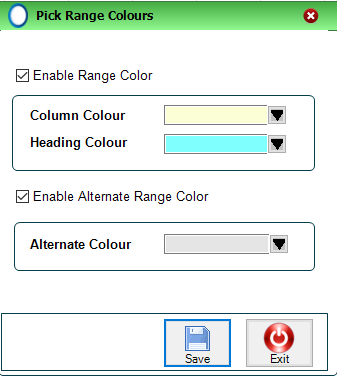
In the above example, blue has been chosen for headings and alternating grey and yellow for ranges.
Click Save to save the changes or Exit to abandon the changes
Adding a range would result in the following effects:
Auto-shift
The Auto-Shift option is where Excelerator predicts where the following range should appear.
On header Ranges, it predicts that the following range will be immediately beneath the previous.
On Detail Ranges, Excelerator predicts that the following range will be immediate to the right of the previous.
When adding new ranges, this reduces the number of keystrokes required.
As a default, Auto-shift is turned off.